As a retreat from my office workloads and other stuff, decided to do a quick apps with Sencha Touch 2, and an apps that can let user draw something to other user would be fun.
So the basic idea is simple, select a friend, and start to draw something, then send it to the friend, and the friend can “see” the drawing being drawn, just like Draw Something.
*There aren’t any much testing involve, and codes probably didn’t well optimized, but it get the apps done quickly.
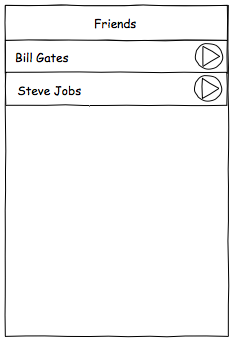
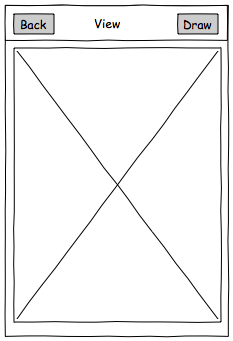
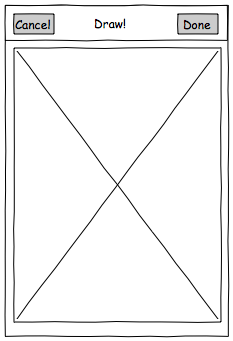
The screens design will be very simple, a page with list of friends, a page to view the drawing and a page to draw, that’s it!
Friend list
View drawing
Drawing screen
app.js
Ext.application({
  name: 'SenchaDraw',
  requires: ['SenchaDraw.view.Viewport'],
  controllers: ['Draw'],
  models: ['Friend'],
  stores: ['Friend'],
  views: ['MainView','FriendList','ViewPanel','Editor','Canvas'],
  launch: function() {
    Ext.create('SenchaDraw.view.Viewport')
  }
});
A very simple app.js, named our apps SenchaDraw, some controllers, model, store and views we going to create later on.
app/view/Viewport.js
Ext.define('SenchaDraw.view.Viewport',{
  extend: 'Ext.Panel',
  config: {
    fullscreen: true,
    layout: 'card',
    items: [{ xtype: 'mainview' }]
  }
})
Even more simple file, the view port, it only have 1 item, which is the Ext.navigation.View, to host other views.
app/view/MainView.js
Ext.define('SenchaDraw.view.MainView', {
  extend: 'Ext.navigation.View',
  xtype: 'mainview',
  config: {
  title: 'Friends',
  navigationBar: {
    items: [
      {
        xtype: 'button',
        text: 'Draw',
        align: 'right',
        hidden: true
      }
    ]
  },
  items: [{ xtype: 'friendlist' }]
  }
})
This is the only view added to the viewport, it has a navigation bar, with a hidden draw button, which will only show when we a in the friend’s view, for us to initiate the drawing to that selected friend. And the only item in this view is friend list view.
app/view/FriendList.js
Ext.define('SenchaDraw.view.FriendList',{
  extend: 'Ext.dataview.List',
  xtype: 'friendlist',
  config: {
    title: 'Friends',
    store: 'Friend',
    itemTpl: [
      '<div>{name}</div>'
    ],
    disableSelection: true,
    onItemDisclosure: function(record,btn,index) {
      this.fireEvent('viewDrawCommand', record);
    }
  }
})
This is a Ext.dataview.List view, with a title ‘Friends‘, loading friend from the store Friend, and displaying the name in a <div>. When the arrow on the list is touched, it will fire a command viewDrawCommand to the controller.
app/model/Friend.js
Ext.define('SenchaDraw.model.Friend',{
  extend: 'Ext.data.Model',
  config: {
    idProperty: 'id',
    fields: [
      { name: 'id', type: 'integer' },
      { name: 'name', type: 'string' }
    ]
  }
})
A super simple Friend model, only need id and name in this app.
app/store/Friend.js
Ext.define('SenchaDraw.store.Friend', {
  extend: 'Ext.data.Store',
  requires: ['SenchaDraw.model.Friend'],
  config: {
    model: 'SenchaDraw.model.Friend',
    data: [
      { id: 1, name: 'Bill Gates' },
      { id: 2, name: 'Steve Jobs' }
    ],
    autoLoad: true
  }
})
Since I intend to do this app quickly, so I just hardcode some friend, why note Bill Gates, and Steve Jobs.
I’m going to use the <canvas> to handle the drawing part, instead of using html in the view, I decided to implement it as a component, by referring to the Sencha Touch 2 source code, specially the button, I created a canvas type.
app/view/Canvas.js
Ext.define('SenchaDraw.view.Canvas', {
  extend: 'Ext.Component',
  xtype: 'canvas',
  template: [
    {
      tag: 'canvas', // this will create a <canvas> in html
      reference: 'canvas', // this will be use in the initialize
      className: Ext.baseCSSPrefix + 'canvas'
    }
  ],
  initialize: function() {
    this.canvas.on({
      tap: 'onTap',
      touchstart: 'onTouchStart',
      touchend: 'onTouchEnd',
      touchmove: 'onTouchMove',
      scope: this
    });
  },
  onTap: function(e) {
    this.fireEvent('tap', this, e);
  },
  onTouchStart: function(e) {
    this.fireEvent('touchstart', this, e);
  },
  onTouchEnd: function(e) {
    this.fireEvent('touchend', this, e);
  },
  onTouchMove: function(e) {
    this.fireEvent('touchmove', this, e);
  }
});
Straight forward code, the template is quite new to me, and apparently it can use to generate a HTML tag, with css class, and even reference that we can refer to from the initialize function.
In the initialize, binding the essential event to the tag, which is touchstart, touchend and touchmove. For each event handler, just fire the event to the controller, remember to pass over the event parameter e, so that we can get the position x and y.
So now the canvas component is ready, we can use it in the view screen and draw screen, where view screen we will replay the drawing and the draw screen, well, draw.
app/view/ViewPanel.js
Ext.define('SenchaDraw.view.ViewPanel',{
  extend: 'Ext.Panel',
  xtype: 'viewpanel',
  config: {
    title: 'View',
    items: [
      {
        xtype: 'canvas', //the canvas we created!
        layout: 'fit'
      }
    ]
  }
})
Very very simple view screen, with one and only item, the canvas we created.
app/view/Editor.js
Ext.define('SenchaDraw.view.Editor',{
  extend: 'Ext.Panel',
  xtype: 'editor',
  requires: ['Ext.Toolbar'],
  initialize: function() {
    var toolbar = {
      xtype: 'toolbar',
      docked: 'top',
      title: 'Draw!',
      items: [
        {
          xtype: 'button',
          text: 'Cancel',
          ui: 'back',
          handler: this.onCancelDraw,
          scope: this
        },
        { xtype: 'spacer' },
        {
          xtype: 'button',
          text: 'Done',
          ui: 'confirm',
          handler: this.onFinishDraw,
          scope: this
        }
      ]
    };
    this.add(toolbar);
  },
  config: {
    items: [
      {
        xtype: 'canvas',
        layout: 'fit'
      }
    ]
  },
  onFinishDraw: function() {
    this.fireEvent('finishDrawCommand',this);
  },
  onCancelDraw: function() {
    this.fireEvent('cancelDrawCommand',this);
  }
})
Another straight forward screen, the screen where we can actually draw something, I call it editor. Here I created my own toolbar because this view will not be added to the main navigation view, because this screen will only be shown when user press on the Draw button, it’s not part of the navigation flow.
Two button on toolbar, the cancel button and finish draw button called Done, and with one and only item, the canvas again*!*
Now all the screen and data already ready, it’s time for the brain. I’m going to go through the code part by part.
app/controller/Draw.js – config
config: {
  refs: {
    mainView: 'mainview',
    drawButton: 'mainview > container > container > button[text=”Draw”]',
    editor: 'editor',
    friendList: 'friendlist',
    viewPanel: 'viewpanel',
    viewingCanvas: 'viewpanel > canvas',
    drawingCanvas: 'editor > canvas'
  },
  control: {
    friendList: {
      viewDrawCommand: 'onViewDraw'
    },
    drawingCanvas: {
      touchstart: 'onTouchStart',
      touchend: 'onTouchEnd',
      touchmove: 'onTouchMove'
    },
    mainView: {
      push: 'onPush',
      pop: 'onPop'
    },
    drawButton: {
      tap: 'onDraw'
    },
    editor: {
      cancelDrawCommand: 'onCancelDraw',
      finishDrawCommand: 'onFinishDraw'
    }
  },
  canvasObject: null, //to reference to canvas
  drawEchoes: [], //record all the drawing steps
  isDrawingStarted: false,
  drawToUser: 0 //which friend to draw to
}
In the refs, define all the reference to all the view, button and canvas we needed, and on the control, bind all the necessary events like touch event on canvas, tap event on button, and the push and pop event for our navigation view, we need this as all the view in the navigation view sharing the same toolbar, so we can use the pop and push to hide and show button based on which screen is showing. Also created variable to help keep track of drawing.
app/controller/Draw.js – onPush, onPop
onPush: function(view, item) {
  if (item.xtype == 'viewpanel') {
    this.getDrawButton().show();
  } else {
    this.getDrawButton().hide();
  }
},

onPop: function(view, item) {
  this.getDrawButton().hide();
}
These two event handler is to mange the title bar button, when a view is pushed in, we check if it is actually a view drawing screen, if it is, then we show the Draw button, so that user can draw to that friend, else, we hide it. And when a screen is popped out (removed), we always hide the draw button, because in this setup, no matter what screen you pop, you will be leaving the drawing screen, so there is no needed for the draw button to be there.
app/controller/Draw.js – onCancelDraw
onCancelDraw: function() {
  Ext.Ajax.abortAll();
  Ext.Viewport.setActiveItem(this.getMainView());
}
When the cancel button is pressed, we wanted to stop the app from doing what it’s doing in that screen and move on, so, the screen that have the cancel button is the drawing screen, and in that screen, the only background process is sending the drawing to server, so we need to use Ext.Ajax.abortAll to cancel it and then set the main navigation view back to screen (remember the drawing screen a.k.a editor screen is not inside navigation view, so we use viewport to change it).
app/controller/Draw.js – onViewDraw
onViewDraw: function(record) {
  if (!this.viewPanel) {
    viewPanel = Ext.widget('viewpanel');
  }

  this.getMainView().push(this.getViewPanel());

  this.setDrawToUser(record.data.id); //will draw to this user

  var self = this,
  canvas = this.getCanvasObject(),
  echoes = this.getDrawEchoes();

  this.setCanvasObject(this.getViewingCanvas().element.dom.childNodes[0]);
  canvas = this.getViewingCanvas().element.dom.childNodes[0];

  canvas.width = viewPanel.element.getWidth();
  canvas.height = viewPanel.element.getHeight();

  echoes.length = 0;

  Ext.Ajax.request({
    url: ‘http://192.168.168.11:8888/SenchaDraw/Get.php’,
    params: {
      to: this.getDrawToUser()
    },
    method: ‘POST’,
    success: function(response, opts) {
      var obj = Ext.decode(response.responseText);

      if (obj.success) {
        echoes = Ext.JSON.decode(obj.echoes);
        self.viewRepeat(echoes);
      }
      else {
        Ext.Msg.alert('Error', 'Oops!');
      }
    },
    failure: function(response, opts) {
      Ext.Msg.alert('Error', 'Oops!');
    }
  });
}
This part mainly is pushing the view drawing screen in, then marked draw to which user id (remember all the get and set is provided by the controller, it’s based on our refs name, and also we access the user id via the record parameter passed in (from onItemDiscloure).
Then I do a lot of testing and debugging, to figure out how to get the HTML <canvas> element from the viewing canvas reference, after get it, set it to the size of the viewing area, so that user can actually draw on the whole area, except the title bar.
Before requesting server for the drawing to be replay, clear the echoes (the steps we record when drawing) , because we need to use it to store the result from server.
By using Ajax request, a request is send to the PHP page on the server, passing in the parameter to, with the user id as value, we need POST (the method) here because it’s going to have a long long string of value to be send (haven’t really test a really long string though).
When the request is success, we first need to change the response text into an object, using Ext.decode. Then we check the success boolean sent from server, to see if request success, if yes, we decode the JSON string into an object (the echoes), after that pass it to the viewRepeat function.
app/controller/Draw.js – viewRepeat
viewRepeat: function(jsonEchoes) {
  var canvas = this.getCanvasObject(),
  isDrawing = this.getIsDrawingStarted(),
  context = null;

  // get canvas HTML element
  this.setCanvasObject(this.getViewingCanvas().element.dom.childNodes[0]);
  canvas = this.getViewingCanvas().element.dom.childNodes[0];
  context = canvas.getContext('2d');

  var totalEchoes = jsonEchoes.length;
  var echoStep = 0;

  var echoInterval = setInterval(function() {
    if (echoStep >== totalEchoes) {
      clearInterval(echoInterval);
      return;
    };

    if (jsonEchoes[echoStep].move) {
      context.moveTo(jsonEchoes[echoStep].x,jsonEchoes[echoStep].y);
    } else {
      context.lineTo(jsonEchoes[echoStep].x,jsonEchoes[echoStep].y);
      context.stroke();
    }
    echoStep++;
  }, 30);
}
In this function, do the usual thing, get the <canvas> object, and then get the 2d context fromt the canvas. Here we use a setInterval to run our code, set it at 30 milliseconds (I felt it is a decent speed). The idea is simple, when we record the drawing, we’ll record the mouse move (without drawing), and mouse drawing position x and y, so in this interval call, we’ll need to check if we already out of move, if not we need to check if it’s a move only or draw, and then we call the canvas context’s moveTo and lineTo (with stroke(), else it won’t show on screen) respectively.
The function will basically loop all the steps we got, and repeat it on the canvas until it’s done, on interval, so it will looks like it’s replaying.
app/controller/Draw.js – onDraw
onDraw: function() {
  if (!this.editor) {
    this.editor = Ext.widget('editor');
  }

  Ext.Viewport.setActiveItem(this.getEditor());

  var canvas = this.getCanvasObject(),
  echoes = this.getDrawEchoes();

  // get canvas HTML element
  this.setCanvasObject(this.getDrawingCanvas().element.dom.childNodes[0]);
  canvas = this.getDrawingCanvas().element.dom.childNodes[0];

  // set the canvas to fill the area
  canvas.width = this.editor.element.getWidth();
  canvas.height = this.editor.element.getHeight();

  echoes.length = 0;

  this.setDrawEchoes(echoes);
}
This event fired when user press on the Draw button on viewing screen, to start drawing. On this event, we get the editor view and move it to the screen (it’s not within navigation view, so we use the Viewport to set the view), and then resize the canvas object to fill the rest of the available screen, also clear the echoes variable which used to store the drawing replay, so that when user leave the editor screen and come back, we won’t get messed up drawing replay.
And oh boy I having hard time to get this done right, am initially facing problem where when user leave the screen and come back, I lost the event binding of the canvas, finally get it right.
app/controller/Draw.js – onTouchStart
onTouchStart: function(self, e) {
  var canvas = this.getCanvasObject(),
  context = null,
  echoes = this.getDrawEchoes();

  // get canvas HTML element
  this.setCanvasObject(self.canvas.dom);
  canvas = self.canvas.dom;
  context = canvas.getContext('2d');

  context.moveTo(e.event.layerX,e.event.layerY);
  echoes.push({x:e.event.layerX,y:e.event.layerY,move:true});

  this.setIsDrawingStarted(true);
}
When user touch and drag around the canvas, it will fire a touchstart event, then continue by bunch of touchmove, and then when user finally lifted the finger, it fire touchend.
When firing the event from the canvas component (app/view/canvas.js), we passed in this and e, so here we can actually get the canvas object via the parameter, we need to use the dom tough in order to get the HTML element.
In this event, because the user didn’t drag the finger yet, so we just need to set the x and y position on the canvas without drawing anything. I’ve been using e.event.offsetX and e.event.offsetY during development on Chrome, because if we use the normal x and y, it will not start at the point where we touch, as it’s the position of the whole screen, but apparently the offsetX and offsetY does not working on mobile Safari, and digging through debug log, if found layerX and layerY actually having same value with offsetX and offsetY, and mobile Safari support it, did a lot of digging around to found out which position to use.
After we set the position, we then need to push the position to the memory (the echoes variable), and we mark it as move:true, so that we know we need to set the position but not drawing in this step. After all done, we mark the isDrawing to true, using this might not be necessary on mobile device, this idea is came from a desktop web environment, as mouse can be moving without holding mouse down, so we need a variable to tell us if the mouse is clicking, so that we know when to draw and when to move.
app/controller/Draw.js – onTouchMove
onTouchMove: function(self, e) {
  var canvas = this.getCanvasObject(),
  isDrawing = this.getIsDrawingStarted(),
  context = null,
  echoes = this.getDrawEchoes();

  // get canvas HTML element
  this.setCanvasObject(self.canvas.dom);
  canvas = self.canvas.dom;
  context = canvas.getContext('2d');

  if (isDrawing) { //should be not necessary
    // e.event.offsetX is not working in iOS
    context.lineTo(e.event.layerX,e.event.layerY);
    context.stroke();
    echoes.push({x:e.event.layerX,y:e.event.layerY,move:false});
    this.setDrawEchoes(echoes);
  }
}
When user is dragging the finger around, this will get fired, another straight forward function, get canvas object, context object, get existing echoes (the drawing position we saved). And since this event is when drawing occurs, so we need to use the lineTo and stroke of the context object, push it to memory, set it to move:false.
app/controller/Draw.js – onTouchEnd
onTouchEnd: function(self, e) {
  this.setIsDrawingStarted(false);
}
When user lift their finger, this event fired, and since the isDrawing should not be necessary, this one should be doing nothing here.
app/controller/Draw.js – onFinishDraw
onFinishDraw: function() {
  var self = this,
  editor = this.getEditor(),
  drawButton = this.getDrawButton();
  // show loading mask, and hide the send button to prevent double submit (i just name it draw button here)
  editor.setMasked({ xtype: 'loadmask', message: 'Sending…' });
  drawButton.hide();

  Ext.Ajax.request({
    url: 'http://192.168.168.11:8888/SenchaDraw/Draw.php',
    params: {
      echoes: Ext.JSON.encode(this.getDrawEchoes()),
      to: this.getDrawToUser()
    },
    method: 'POST',
    success: function(response, opts) {
      editor.unmask();
      drawButton.show();

      var obj = Ext.decode(response.responseText);
      if (obj.success) {
        Ext.Viewport.setActiveItem(self.getMainView());
      }
      else {
        Ext.Msg.alert('Error', 'Oops!');
      }
    },
    failure: function(response, opts) {
      editor.unmask();
      drawButton.show();
      Ext.Msg.alert('Error', 'Oops!');
    }
  });
}
So when user finish drawing, and press the button to submit, when the user do that, we will need to fire a Ajax request to server, and we’ll need to show a loading message, and hide submit button (to prevent double submit), then everything else is just like the requesting for view screen, except passing in extra params echoes, which is an JSON string encoded from the echoes array. When the drawing successfully submitted, quit the editor.
Alright! All set on the Sencha Touch ends, but wait, how server know who is sending drawing to who? How server knows who are you? Due to my laziness, I’ve skip the account setup function, so in this version, it’s like the person is drawing back to himself, when you select a friend, we set it the user id and post it, remember? And then when we retrieve, we’ll retrieve it back, so it’s like they drawing to themselves, weird people.
Database
The database design is damn simple here, a table called Drawing, that’s it.
| id | int (auto) |
|---|---|
| userid | int |
| echoes | longtext |
The userid is to which user the drawing is going to send to, the echoes is the JSON string of the drawing replay.
Draw.php
$link = mysql_connect("localhost","root","root");

mysql_select_db("SenchaDraw",$link);

$query = "insert into Drawing values(NULL, " .$_REQUEST["to"]. ", '".$_REQUEST["echoes"]."')";

$result = mysql_query($query);

if (mysql_affected_rows() > 0) {
  $output = array("success" => true);
} else {
  $output = array("success" => false);
}

mysql_close();

header("Content-Type: application/x-json");
echo json_encode($output);
This page on server will basically retrieve the user id from parameter to, and the JSON string from parameter echoes sent via Ajax in onFinishDraw function, and insert into database, that’s it.
Get.php
$link = mysql_connect("localhost","root","root");

mysql_select_db("SenchaDraw", $link);

$query = "select * from Drawing where userid = " .$_REQUEST["to"]. " order by id desc limit 1";

$result = mysql_query($query);

if (mysql_affected_rows() > 0) {
  $row = mysql_fetch_array($result);
  $output = array("success" => true, “echoes” => $row["echoes"]);
} else {
  $output = array("success" => false, “message” => mysql_error(), "query" => $query);
}

mysql_close();

header("Content-Type: application/x-json");
echo json_encode($output);
This page will request a record from database, it required the user id passed in the parameter to, sent via Ajax in viewDrawing function, and then it push out the JSON string of the drawing reply (echoes) as JSON back to the apps.
Demo
See Bill Gates and Steve Jobs having fun with themselves!
If you can’t watch the video above, download it here.
Source code: https://github.com/stephensaw/SenchaDraw


